Music Editor
If you've recently upgraded to GB Studio 4 from an earlier version, please review this migration guide to ensure your music is properly updated.
If you have your Music Format in the Settings View set to UGE (hUGEDriver) (the default in GB Studio 3 and above) you can add music to your game by including .uge files in your project's assets/music folder.
Those files can be edited using the Music Editor by clicking the Project View Button and selecting Music. The editor also allows to create new songs by pressing the + button on top of the Song list.
.ugefiles can also be edited using hUGETracker
Getting Started
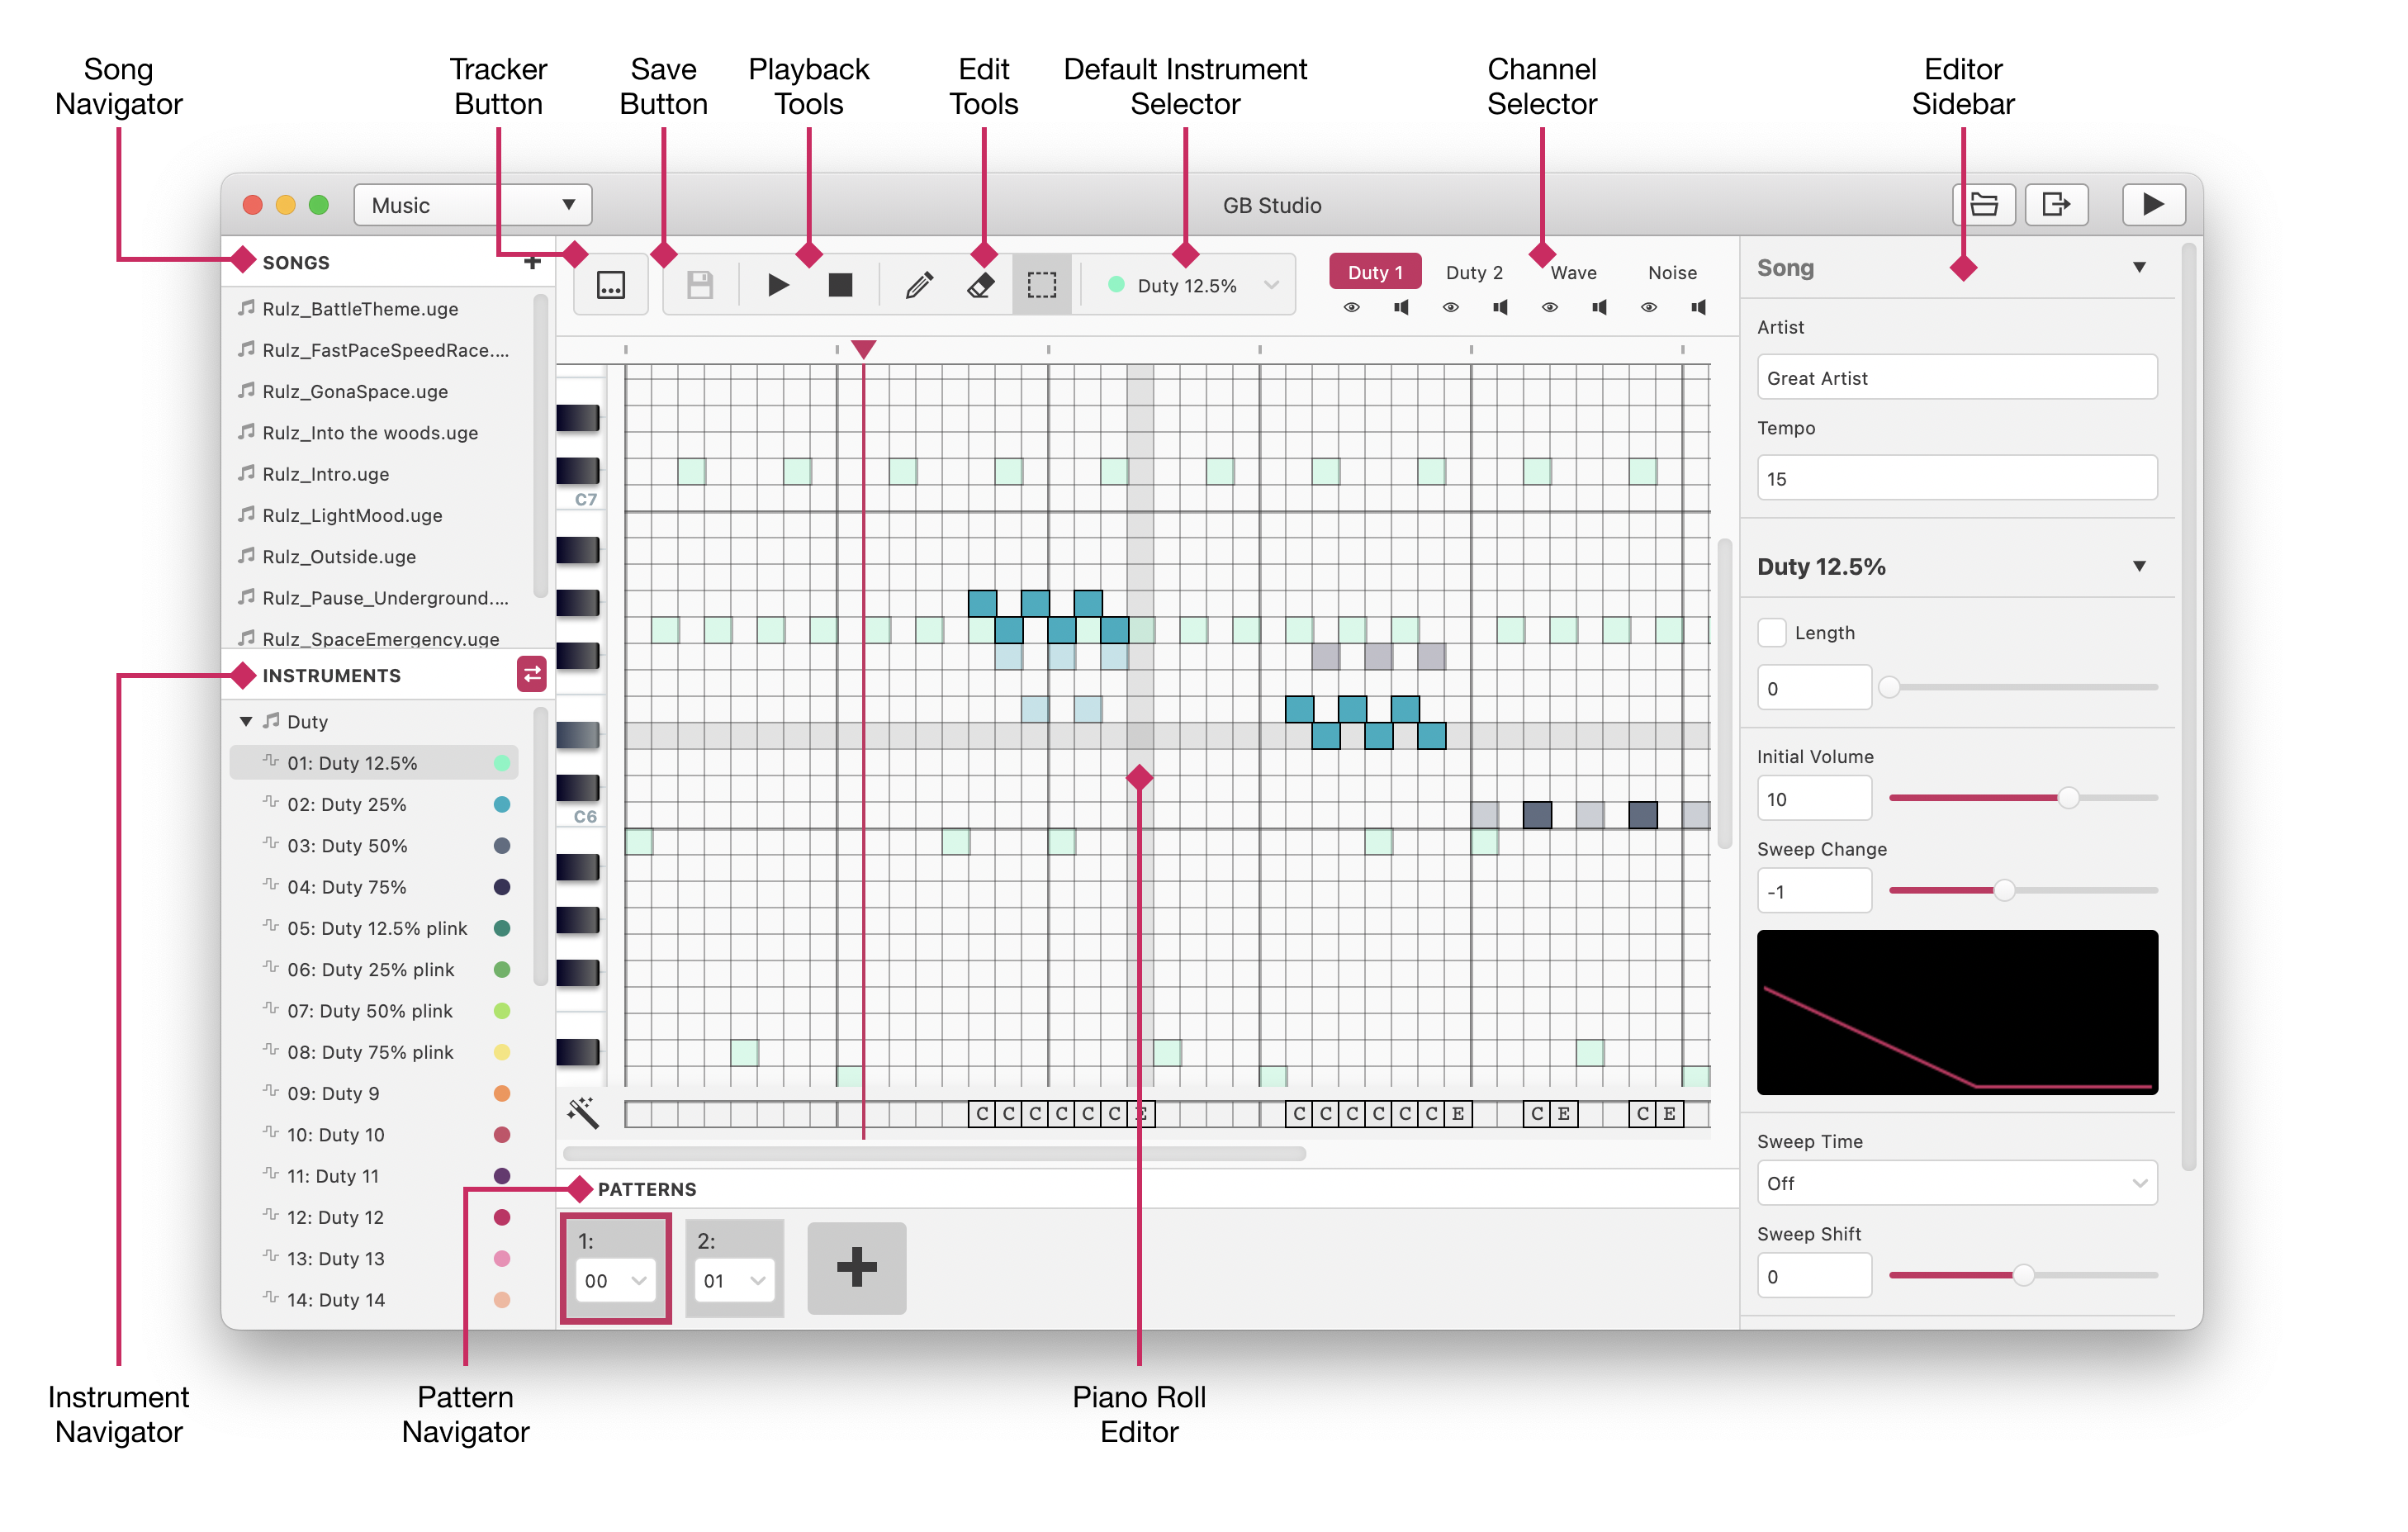
The Music Editor is divided in three parts:
-
Navigator: Contains the list of songs and instruments for the selected song
-
Song Composer: The music editor itself. Has two views: Piano Roll and Tracker. The first icon in the toolbar allows to change views.
-
Editor Sidebar: Allows to edit the song title, artist name and tempo and also shows the instrument or effect editor when selected.
Structure of a Song
A song consists of:
- Four Channels: Duty 1, Duty 2, Wave and Noise.
- Each channel is better suited for a different type of sound (for example: the Noise channel is usually fit for drum rythyms).
- Each channel has its own set of 15 Instruments. Duty 1 and Duty 2 share the same set of instruments.
- Multiple Patterns, a unique group of notes in each of the four channels.
- Each pattern contains a sequence of up to 64 notes per channel, and each note is formed by a pitch ranging from
C-3toB-8, an instrument and an effect. - Patterns can be repeated or arranged to form the full song using the Pattern Editor.
- Each pattern contains a sequence of up to 64 notes per channel, and each note is formed by a pitch ranging from
- A Tempo, how many ticks (64 per second) have to elapse before a row is complete. The greater the number of ticks, the slower the song is.
Piano Roll
In Piano Roll mode you use the mouse to add notes to the pattern. It reads like a music sheet, the time is represented in the horizontal axis (columns) while the note pitch is represented on the vertical axis (rows).

You can only add notes to one channel at a time, selectable on the top right toolbar. The channels can be muted with the speaker icon for each channel. The channels that aren't selected can be previewed by clicking the eye icon.
Using the Piano Roll
To input a note, select the pen tool in the toolbar and click on a cell. The note will use the selected instrument in the toolbar.
To remove a note, select the eraser tool in the toolbar and click on an existing note. You can also right click on an existing note to remove it.
To select a note, select the selector tool or press Shift. Once selected a group of notes and drag and drop them anywhere else in the grid.
The effect bar, at the bottom of the piano grid, allows to add an effect to a given note using the effect editor in the right pange.
The song can be previewed at any time by pressing the play button.
To set the playback starting position, click the area above the piano roll, where the playback head is shown.
The song can be saved by pressing the save button or Ctrl/Cmd + S.
Tracker
In Tracker mode you use the keyboard to add notes to the pattern. The song advances from top to bottom, with each row representing a position of the song.
There's one column for each channel, and each column is divided in 3 fields: Pitch (or Note), Instrument and Effect.
C-5 01 240
--- -- ---
 |   |  |
 |   |  +------ Effect column (Volume changes, arpeggios, panning, etc.)
 |   +--------- Instrument
 +------------- Note and octave (A C note in the 5th octave. The dash can be a #, which signifies a sharp note e.g. C#, D#)
Rows can be empty, or can be partially filled (with just an effect, for example).
Using the Tracker
The song grid can be navigated with the cursor keys.
There's two keyboard layouts to input the values in the note column. The layout can be selected in the GB Studio Preferences window.
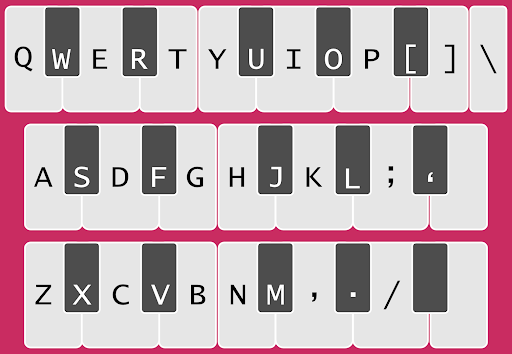
Linear layout

This is the layout used by trackers like OpenMPT and hUGETracker.
Each keyboard row (or "line") represents one octave on a piano. Keys from Q to / are used to input the values, starting with C in the base octave (3 by default).
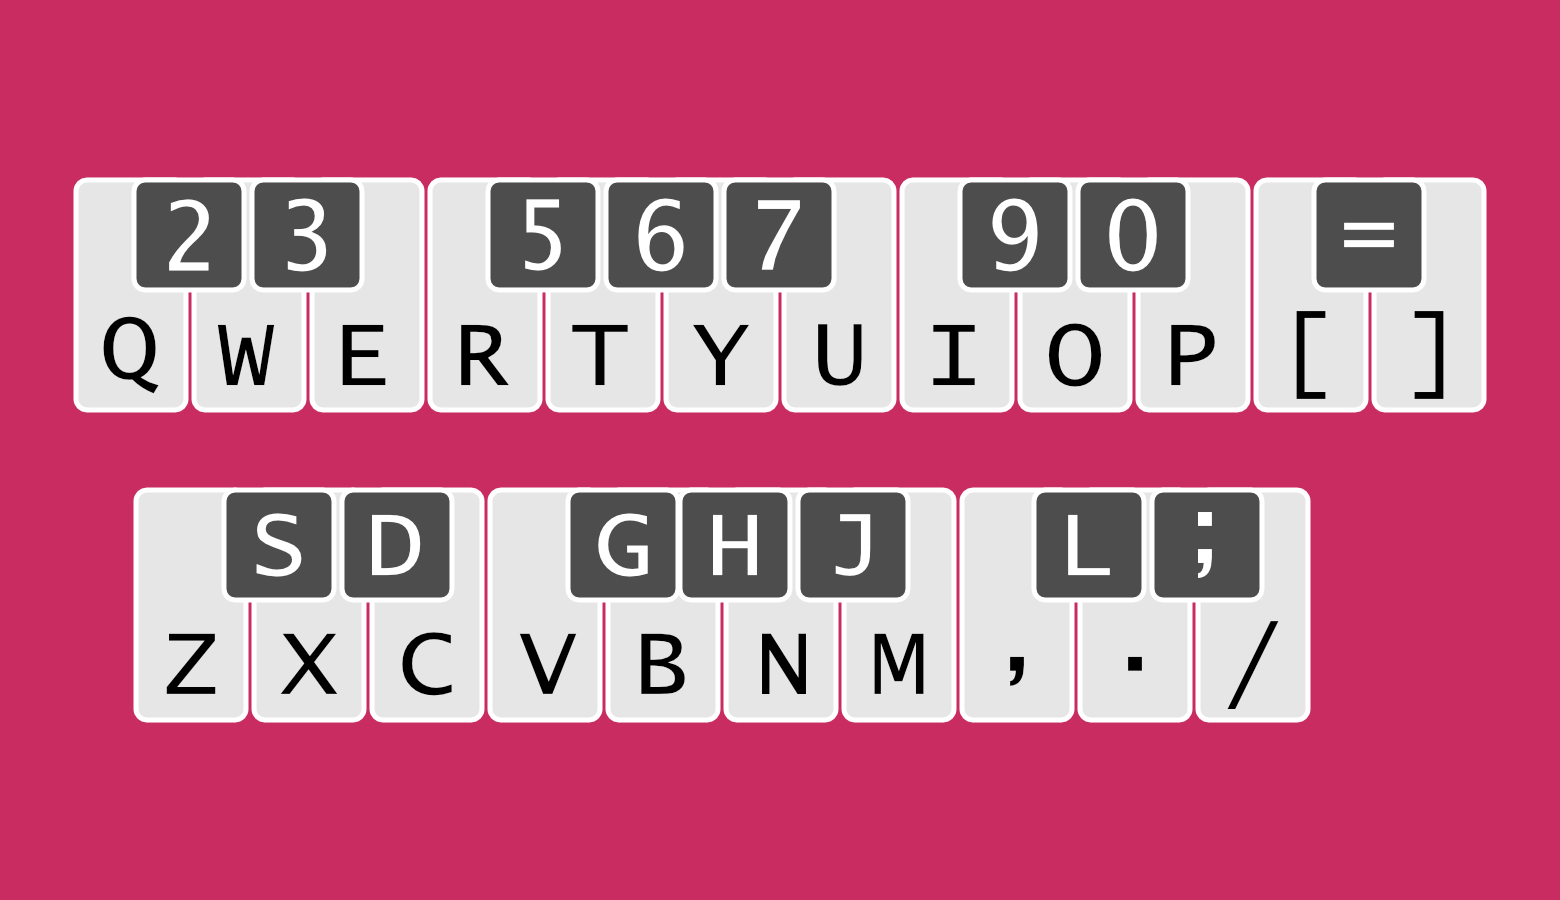
Piano layout

This is the layout used by trackers like MilkyTracker or FastTracker2.
The keyboard is split in two of groups of two rows of keys. On each group the top keys represent the black keys of a piano, andthe bottom keys the white ones. Keys from 2 to / are used to input the values, starting with C in the base octave + 1 (4 by default).
The base octave can be selected in the toolbar.
The numeric keys are used to input the value in the instrument column. A default instrument can be selected in the toolbar and be used automatically when adding a new note.
The numeric keys, and keys A through F are used to input values in the effect column.
The song can be previewed at any time by pressing the play button.
To set the playback starting position, click the row number on the left side of the tracker grid.
The song can be saved by pressing the save button or Ctrl/Cmd + S.
Pattern Navigator

The dropdown menu on each cell allows you to select one of the existing patterns or assign an empty one to the current position.
The plus button allows you to add a new pattern to the song.
Note: any unused pattern will be removed from the song on save.
Instruments
Borrowing from the descriptions on the hUGETracker manual
Selecting an instrument in the left sidebar will open the instrument editor on the right sidebar.
Changes to the instrument can be previewed at any time by pressing the "Test Instrument (C5)" button, which will play the C5 note for a few seconds with the selected instrument.
Other than the instrument name, each instrument has its own set of fields that can be edited.
Duty Instruments
Length: When enabled, the note will be cut off immediately at a specific length. If not enabled the note will play until a new note starts.
Initial Volume: Sets the starting volume for the envelope. If there's no sweep change set this will be the volume for the note.
Sweep Change: Defines how steep the volume change will be. The higher or lower the value, the quicker the note will fade in or out.
Sweep Time: Selects the "sweep time" for the note to take. The greater the value, the slower the sweep.
Sweep Shift: Selects the direction and magnitude of sweep for the note to take per "tick" as specified by Sweep Time. Positive values portamentos the note up, negative values portamentos it down.
Duty: Selects the timbre of note to play. Each one sounds different, and they are useful when you don't want both of the duty channels to clash with one another.
Wave Instruments
Length: When enabled, the note will be cut off immediately at a specific length. If not enabled the note will play until a new note starts.
Volume: Specifies at what volume a wave instrument shall play unless overridden by a volume effect command. There are only 3 possible values here, as the wave channel's volume interface is more limited than the other channels.
Waveform: Selects which waveform should play as part of this instrument. The selected waveform can be edited by drawing on the waveform preview.
Noise Instruments
Length: When enabled, the note will be cut off immediately at a specific length. If not enabled the note will play until a new note starts.
Initial Volume: Sets the starting volume for the envelope. If there's no sweep change set this will be the volume for the note.
Sweep Change: Defines how steep the volume change will be. The higher or lower the value, the quicker the note will fade in or out.
7-bit counter: When checked, the instrument will sound more like a musical tone rather than noise.
Noise Macro: Like an arpeggio effect, set up to 8 pitch changes +-32 from the noise frequency, advancing every frame. Freat for kick drums or fast sweeping noise. Must be shorter than your current song tempo.
Effects
Borrowing from the descriptions on the hUGETracker manual
| Effect | Name | Description |
|---|---|---|
| 0xy | Arpeggio | On every tick, switch between the playing note, note + x, and note + y, where x and y are values in semitones. Can be used to create "chords" or a strum effect. |
| 1xx | Portamento Up | Slide the pitch up by xx units every tick. |
| 2xx | Portamento Down | Slide the pitch down by xx units every tick. |
| 3xx | Tone Portamento | Slide the pitch towards the specified note value by xx units every tick. Stops when it reaches the specified note value.This effect cannot be used in a cell with an instrument value. |
| 4xy | Vibrato | Rapidly switch between the specified note value and note + y, at the rate of x, where y is a value in units. This is similar to arpeggio, except you can control the frequency, and the amount is specified in units rather than semitones. |
| 5xx | Set Master Volume | Sets the master volume control of the Gameboy for the left and right speakers. Use the effect editor to create one of these effects. Note that a volume of zero is not completely silent. |
| 6xx | Call Routine | Call a user-defined routine. Routines can be created by using the Set Music Routine event. |
| 7xx | Note Delay | Wait xx ticks before playing the note in this cell. |
| 8xx | Set Panning | Sets which channels play on which speakers. Use the effect editor to create one of these effects. Can also be used as a mute for a channel by setting it to output on neither left nor right. |
| 9xx | Set Duty Cycle | Select duty cycle for either the Duty 1 or Duty 2 channels. If this effect appears on the Noise or Wave channels, it will affect the Duty 2 channel. Valid values for xx are 00, 40, 80, C0. Under the hood, the xx value is loaded directly into Duty 1 or Duty 2's length register, so you could theoretically achieve other effects than just duty cycle changing. |
| Axy | Volume Slide | Slide the note's volume up by x units, and then down by y units.This effect actually retriggers the note on each tick, which might not be noticeable for instruments without length/envelope, but could potentially sound bad if those are present. Recommended to use either instrument envelopes, or the C command instead if you can.This effect does not work in the same cell as a note/instrument! |
| Bxx | Position Jump | Jump to the start of pattern xx. If xx is 00 jump to the next pattern. |
| Cev | Set Volume | Set the envelope e and volume v of the channel. Must be accompanied by a note and instrument to work (except on the Wave channel).Valid volumes range from 00-0F (00,04,08,0F for Wave channel). Valid envelopes for Cev 00-F0, 0 use instrument, 8 no fade, 1-7 fade quieter, 9-F fade louder, smaller values fade faster. |
| Dxx | Pattern Break | Jump to the next pattern early, and start on row xx. |
| Exx | Note Cut | Cut the note short after xx ticks. |
| Fxx | Set Speed | Set the number of ticks per row to xx. Can be used in an alternating fashion to create a swing beat. |