Settings
Clicking the Project View Button and selecting Settings will take you to a list of your project's settings.
Color Options
GB Studio has support for multiple color modes, each provides different features, limitations and device compatibility.

-
Monochrome
Allows your game to run on all devices, using four colors only.
Supported platforms: GB, GB Color, Super GB, Analogue Pocket -
Color + Monochrome - Allows your game to run on monochrome and color devices.
Color palettes can be used to color your scenes on compatible devices.
Supported platforms: GB (Monochrome only), GB Color, Super GB, Analogue Pocket -
Color Only Increases the amount of tiles available in each scene for displaying backgrounds and sprites. Allows your game to run on color devices only.
Supported platforms: GB Color, Analogue Pocket
Depending on the chosen color mode you may then also see additional settings.

-
Color Correction
Modifies your color palettes to closer match how they would appear on original hardware. On a physical GBC screen, colors appear more washed out than on modern monitors. Many emulators (including the one built into GB Studio) account for this, so turning on color correction allows your colors to appear as expected. If you prefer not to use this, you can disable the feature, causing hex colors in your palettes to appear as they would on a modern monitor. -
Automatic Tile Flip
Color Only scenes have the ability to flip background tiles horizontally, vertically, or both, allowing scenes to use less tile memory. This is a fully automatic process. However, if you prefer not to use it (for example, if you need strict control over the order of tiles in memory for scripting), you can disable it for your project here. Alternatively, you can turn this feature on/off per scene in the Scene Editor sidebar from the top right dropdown in Color Only scenes.

- Default Monochrome Palettes
Allows you to set the background palette (BGP) and two sprite palettes (OBP0 and OBP1) which are used when running a game without color.

- Default Background and Sprite Palettes
When color mode is eitherColor + MonochromeorColor Onlyyou can select up to 8 Default Background Palettes and 8 Default Sprite Palettes, these are the palettes that every new scene in your game will use unless you specifically override them. See Coloring a Scene for how to use background palettes.
Super GB Options
To enable support for Super GB click the Enable Super GB Mode checkbox.

This mode will allow you to set a custom 256px × 224px border image and color palette to use when your game is run on compatible hardware or emulators.
The first time you build your game after enabling this mode a default border image will be copied to your project in assets/sgb/border.png, edit this image to replace the border with your own.
Scene Types
GB Studio includes multiple built-in Scene Types that define how a scene behaves. You can also add your own scene types by extending GB Studio.
Use this section to enable only the scene types you need, and to configure settings for each type.

This section also allows you to replace the default player sprite sheet that will be used for scenes of that type.
You can override the player sprite sheet for an individual scene in the scene’s properties, or at runtime using scripts.
Engine Settings
Depending on which scene types are enabled, you’ll see a list of engine settings for those types. These let you fine-tune how your game feels, such as adjusting gravity in Platformer scenes or changing Top Down 2D scenes to use a 16px grid.

To reset to the original values you can use the Restore Default button.
UI Elements & Fonts
Use this section to view the frame image used for dialogue windows in your game, the cursor image used in menus and to select the default font for your project. Clicking the cursor or frame image will open them in your selected image editor, alternatively you can find the files in your project's assets/ui folder.

Fonts
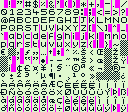
Fonts can be found in assets/fonts and consist of a .png image and .json definition file sharing the same name. For example, gbs-mono.png and gbs-mono.json. A font's .png image should contain characters with a maximum size of 8px by 8px, arranged in rows 16 characters wide.

By default, fonts use an ASCII mapping with character code 32 (Space) mapping to the top left character in your font. You can provide a custom mapping by editing your font's .json file as follows.
{
  "name": "Japanese Font",
  "mapping": {
    "ヲ": 166,
    "ァ": 167,
    "ィ": 168
  }
}
In this example using a ヲ character will now display character 166 from your .png.
Please note that as the first 32 ASCII characters are not included in your image you need to account for this in your mapping, for example if you wanted to map the character ? to the second tile in your .png you would set the mapping to be "?": 33
You can create variable width fonts (with characters less than 8px wide) by filling the right edge of your font's characters with magenta #ff00ff like the example below.
When Color Mode is enabled, UI elements and fonts adopt the colors chosen for GB Color background palette #8. See Coloring a Scene for how to use background palettes.
Music Format
The music format chooses which music engine to use in your game, this in turn determines the format of the music files supported in your project.
The recommended setting is UGE (hUGEDriver) (.uge files), as this enables you to use the inbuilt music editor, though if you have created a project in GB Studio 2.0 or below you will need to keep this setting as MOD (GBT Player) (.mod files) to maintain compatibility with your existing music files.

See Music for more information.
Controls
The Controls section allows you to override the default controls used when playing your game from a web build and the Play Window.
To edit the controls for a button click on the input box and while the input is highlighted type the key you wish to assign. To remove all the assigned keys click the input and then press the Backspace key on your keyboard.

To reset to the original controls you can use the Restore Default button.
Cartridge Type
The Cartridge Type section allows you to choose which Memory Bank Controller you want to use and if you want to enable Batteryless Saving for compatible Flash Carts.
If you don't know what these settings mean it's best to keep this as the default of MBC5, with Batteryless disabled which you can do by using the Restore Default button.
Build Options
The Build Options section allows you to modify settings relating to building your project.

-
ROM Filename
By default, exported ROMs use your project name as the file name. You can override it here (don't include a file extension, this will automatically use.gbor.gbcdepending on your selected color mode). -
Open Build Log On Warnings
Choose if the Build Log should be displayed automatically when warnings are displayed such as "too many unique tiles or palettes used in a scene". If you're choosing to ignore these warnings it can be helpful to disable them, otherwise it will be displayed every time your game runs. Please note that errors building your project will always open the Build Log regardless of this setting. -
Generate Debugging Files
When usingExport ROM, additional debugging files (such asgame.cdb) are generated which allow improved debugging when testing your game in compatible emulators such as Emulicious. -
Open Build Folder on Export
When exporting a ROM, GB Studio will open the folder containing the exported files in your operating system's file browser. Disable this option if you'd prefer it not to open automatically.
Custom HTML Header
You can use the Custom HTML Header section to add content to the HTML <head> when generating a web build of your game. You can use this to add any custom CSS or Javascript you want to the web build HTML page.